Monday, October 15, 2012

To ZAP or not to ZAP


Here's where the "Diary" part of my blog comes in...  So last year my school adopted the Z.A.P. program, also known as Zeros Aren't Permitted, whereby a student who came to one of their MESH (Math, English, Science, History) classes without their homework, would be "Zapped."  This includes the student filling out a Z.A.P. form, then being called out of class a few minutes before their last class of the day ended and brought to the library where they had to complete the missing assignment.
This year, the Z.A.P. program opened up to the other disciplines, including Art, and I jumped right on board.  Seriously, the only way a kid can do poorly in my class is to NOT do the work at all.  And you'd be surprised at how many kids chose not to do my fun (obviously) and relatively easy SINGLE homework assignment every week.                                                Because of my school spirit, if you will, I thought it would be fun to get some sort of space gun that made a zapping sound for those deserving of a Z.A.P.  I immediately came home and shopped my beloved ebay and found this obnoxious piece of equipment.  

Wouldn't you know it, a day later while I was checking out at Bed, Bath and Beyond (another favorite haunt), I saw this darling little ray gun key chain near the cash register.  I had to have it!  A teacher can't have too many fake guns in class, can she? (Note the size difference)  


While I waited for the Jumbo Zapper to come in the mail, I introduced the kids to my Baby Zapper and they got a real kick out of its little "peuw peuw" sound and light up barrel.  I didn't seem to offend anyone when they got ZAPPED and I only ever have one or two in every period now that they know I'm serious.

Last week Mr. Postman finally delivered my anticipated Jumbo Zapper, and it is even more obnoxious than it looks.  It has a light up spinning disk in the center, the tip moves back and forth and it makes more of a machine gun sound.  Loudly.  

I was so excited to introduce it in class, mostly because I like to make the kids laugh (I'll be the first to admit, it's an ego boost).  They all thought it was funny.  Until... going around checking homework, I came to one student in who did not have their homework.  I pulled the Jumbo Zapper out from under my arm and announced, "You know what THAT means..." I gave the student a few rounds from the JZ (Jumbo Zapper) and the look on their face... I'll never forget it.  The student was not entertained by me drawing attention to them in the slightest.  I kept JZ on the DL for the rest of the period and, that night while trying to fall asleep, thought about what it would sound like if this student were to tell their parents about what happened in class today.  Now, mind you, the atmosphere in my class is light and fun and I make a joke out of almost everything to maintain that feeling.  But I thought about how, "My teacher pointed a toy gun at me in class today for not having my homework" would sound if spoken outside of room 185.  Then I imagined the television announcing: "Teacher points toy gun at student for not having their homework.  Story at 11:00." 

Needless to say, I love my job, so I have retired the Jumbo Zapper, albeit a short-lived career in room 185.  I think I'll just use it on my own kids at home when they don't eat their veggies. J/K.


Thursday, October 11, 2012

Papel Picado Critique

Getting ready for today's critique of the Papel Picado inspired assignment in my Design Crafts class.

Tuesday, October 9, 2012

10-9-12 Daily Sketch

Today daily sketch and Crafts was to copy a picture of a patriot lamp. We discussed the difference between fine and applied arts, then they were to design their own lamp.

In Calligraphy, their prompt was "broken letters."

Sunday, October 7, 2012

Design Crafts: Papel Picado

After spending some time talking about the Elements of Art and Principles of Design, our first project of the year is always papercutting, or Papel Picado (I always say that with a deep voice and a thick Mexican accent.  I can't help it.)


I start the lesson pointing out the examples of Papel Picado I have hanging from my classroom ceiling.  See them up there?


Then, like every lesson (I like routine), I start with a Power-Point lecture that goes over the history of the technique, different cultures that practice the craft and what their assignment will be.
POWER POINT FOR PAPEL PICADO LECTURE

I also make an accompanying "study sheet" with key terms in the lecture so they know what and when to write down.  I even go so far as to put the key terms in RED in the Power Point so they know when it's a key term and on the study sheet.  Isn't that nice of me?
PAPEL PICADO STUDY SHEET

In addition, I make an "Assignment Sheet" that has the project title, objectives, materials, instructions, rubric and critique form all-in-one.  The assignment sheet is great to give to students who need clarification on instructions, students who were absent and missed the demonstration, but definitely NOT for the student that was spacing out during my engaging presentation.  Because that never happens. 
PAPEL PICADO ASSIGNMENT SHEET

Their fist step is to think of a loved one that has died and that they would like to honor.  Then, they search the internet for silhouette pictures that support their memory of that person and what they were like in life.  I have them get 1 large, 2 medium and 2 small shapes, paste them in a Word document and print.  Like so: EXAMPLE OF IMAGES.

If I have time during this project, I like to show this video, from Crizmac:


With a corresponding worksheet I made that follows right along with the video.  Wouldn't want the little buggers to take a nap during this intriguing 20 minute film!


Gotta run... I'll add more to this ASAP!

Design Crafts... What's that?

I've been teaching Design Crafts for... I think five years now. It's the offspring of a since retired colleague of mine and while it gave me anxiety to have a new prep (what doesn't give me anxiety?), I absolutely love teaching the class.

What is it?  Good question!  Most of our projects revolve around folk artsy things. I try to pick projects that have some good history, cultural references, aren't too expensive to make and are 3-dimensional.  Not all projects fit this category, but most.

Like every class I teach, I've got the Course Description, the warm-up drawings, the homework, the class projects and the final.  Once I lay the groundwork here, I'll post often so you will get the gist. 

For those of you interested, here's the Course Description for Design Crafts. 

Here are the lists for homework assignments. I give one a week, every week. 10 points each.
First Semester List
Second Semester List

Here are the lists for the warm-up or "Daily Sketches." They do a sketch every day of class and after 15 minutes I give them a stamp, if merited.  Each stamp is worth 5 points and I collect the stamp sheets at the end of each quarter.  There are some extra blank lines for them to do extra credit sketches as well. 
First Quarter List
Second Quarter List
Third Quarter List
Fourth Quarter List

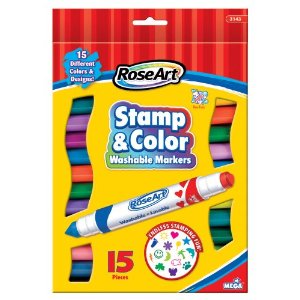
For "stamping" their Daily Sketchbook Logs, I use these Rose Art Stamp and Color Washable Markers:

Hand Out days I give them, well, a hand-out to copy. I rip these off from all over the place: books I have, the internet and teachers more clever than me.  I never imagined I would be sharing them so I can't remember where most of them came from, but I promise that from here on out I'll make sure to site my sources.

I will start updating every week what our sketches are with examples so anyone interested can see the kind of work I get from my students with both the hand-out days and the "prompt" days.

Tuesday, October 2, 2012

Pyramid of __________

The prompt for my Design Craft's warm-up sketch today was "Pyramid of __________". They came up with some great ideas; here a few of my favorites:

Sunday, September 30, 2012

Moving Right Along

Trust me, it's been killing me not to update.  I've been taking lots of pictures and had so much to share but.... you know how it goes: busy, busy, busy.

So here's what's been going on in Calligraphy:

My summer order has been trickling in slowly, but surely.  Not necessarily in order of importance, unfortunately.  I got the "Calligraphy Kit" boxes and some felt tip pens.  Each student has a cubby (there's an "A" and a "B" cubby, each with 10 shelves.  To make room for everybody they have to share, so if a student is assignmed A4R, they are cubby A, shelf 4, on the Left side.

I had my T.A. label all the boxes with masking tape and a Sharpie, then label the markers.  Hopefully this will encourage streamlined materials get out/put away and avoid thievery (hopefully).


We've been continuing our warm-up sketches each day, some are prompts, where they create letters/words inspired by my prompt, sometimes they copy alphabets from a hand-out.

In the last couple of weeks our hand-out drawings have been:
Hand Outs: 
Tattoo Letters ~I had them copy this alphabet then design a tattoo with them.


Prompts:

Letters with Shadows                                                 "Newport Harbor" Backwards

Doodles Behind Letters                                              Lizard Letters


The students were also responsible for a homework assignment in their Composition Books.  So far we've done three:

#1.  Collage of Letters


#2. Connected Signatures

 #3. Number Cluster
In class, since we're still waiting for or nib sets and ink, I gave a lecture on the History of Writing (see last entry)

 I had them practice a basic Roman Alphabet in their Composition Books, then write the Pledge of Allegiance in the same font.


Next, we had a lesson on the History of Writing Tools using this Power Point.

Luckily, I had some extra feathers on hand from my Crafts Class to make Quill Pens.  I just used a box cutter to slice off the tip of the feather at an angle, then used scissors to cut a small slit at the tip.  I did have SOME ink, and some baby food jars that I had saved from when my kids were babies, so I made a few jars of ink for them to use.  

First, they just practiced with the Feather Quill:


 Then I let them use a pen with a plastic handle and steel nib (I had some of those on hand from YEARS ago), and had them write the Gettysburg Address.  I wanted them to write a document that had originally bee written with a Quill Pen.

Next on the agenda: Contour Letters


Monday, September 17, 2012

Calligraphy Supplies Still Not Here

Still waiting for all the papers, pens, handles, nibs and ink to arrive.  In the mean time, we had our Daily Sketch today which was a prompt, "Letters with Shadows."  I was curious to see what they would come up with, but most of the students translated it quite literally. 


I also started in on the history of writing with this Power Point and this coordinating study sheet with the important terms for them to take notes during the lecture.

Next, to have some hands on Sumerian fun, I gave each student this handout:


Then I gave each student a small piece of air dry clay and a wooden stylus to create their own Sumerian tablet.


(Girlfriend needs a manicure. Not classy! I guess neither is me pointing out, but still.)


Next class they will try to translate each other's symbols using the key on the worksheet, then we move on the Hieroglyphics!

The students learned how the Egyptians used pictographs which were simplified pictures to represent thoughts and sounds. They each drew a CARTOUCHE and wrote their names in Hieroglyphics!


Sunday, September 16, 2012

Getting Started with Calligraphy

Towards the end of the 2011-12 school year our department discussed adding some semester-long courses.  The deadline had passed to submit a new course curriculum, so I asked what semester-long courses were already approved and on the books. Turns out we had a Calligraphy course available so I jumped at the chance.  I'm still waiting on my order to come in for the basic supplies, so I've had to be creative with my instruction to keep the students busy with worthwhile activities.

Let's start with the Course Description.  I use the same basic format for all of my classes. I did a lot of research on the web and in books to figure out how I wanted to approach teaching this class (I am still figuring it out, to tell you the truth).

Composition Books
Because I teach on a 90-minute block schedule, I like to start the all my classes with a "Daily Sketch" or warm-up. It's a great way to get the kids settled down and their creative juices flowing.  It also gives me time to take roll, get kids who were absent caught up, etc. and since I don't collect the "Stamp Sheet" until the end of each quarter, it teaches them some responsibility and accountability (they must complete every assignment, regardless of attendance).  

I asked all the students to get a simple Composition Book on their own. They have to do the Daily Sketch every day, regardless of attendance.  I give the students this Stamp Sheet that has all the assignments for the quarter, plus a few empty lines at the bottom for extra credit.


Every other day I give them a hand-out to copy and a prompt that can be interpreted any way they like.  After 10-15 minutes I give them a stamp (if they deserve it through effort and completion.  I use these cool little stamp markers that fit perfectly in the little spot for stamping!

I get the images for hand-outs all over the place online.  I wish I had kept track of where I found all of them so I could give credit to the creators, but I will admit that none are from my own head. I am a thief.
I will post my handouts as I do them in class.  The first one was "Bubble Letters." The second was a prompt: Your Birthday, so they were to create a design/drawing out of their birthday (simple enough, right?)  I provide colored pencils if they want to use them, but just plain old pen or pencil is fine, too.


Two-Pencil Technique
While we waited for our supplies to come in, I taught them the "Two-Pencil Technique" that I learned about from THIS fabulous blog. She's even got videos to demonstrate!


First, I demonstrated the technique, then I had them do the entire alphabet it in their composition books.  After the letters are drawn, they need to close the open ends.  Then I talked to them about value,  demonstrated creating value with colored pencils and instructed them to add value to each letter in any color combination of their choice.

Ta Da!